-
EducationRamiz Kara is a freshmen at Emory University as a Pre-Med track, and he had some questions. He wanted to know the effects of meditation on brain waves and abstract problem solving, so he decided to make his own experiment to measure this, using our EEG device, the Heart and Brain SpikerShield. Although he didn’t find conclusive […]
-
![[Summer’16 Internship] Neuroscience of Grasshopper Jumps](https://cdn.hackaday.io/images/1343911474750447009.JPG) EducationDESCRIPTION Update June, 2017: My paper was published! Check it out here in JUNE (Journal of Undergraduate Neuroscience Education). … Why are grasshoppers so hard to catch?! I aim to study the neuroscience behind this question by replicating past studies on grasshopper vision. Grasshoppers can sense an approaching object and quickly hop away to avoid […]
EducationDESCRIPTION Update June, 2017: My paper was published! Check it out here in JUNE (Journal of Undergraduate Neuroscience Education). … Why are grasshoppers so hard to catch?! I aim to study the neuroscience behind this question by replicating past studies on grasshopper vision. Grasshoppers can sense an approaching object and quickly hop away to avoid […] -
![[Summer’16 Internship] Neuroscience of Grasshopper Jumps: Classic experiments: DCMD response to approaching balls](https://cdn.hackaday.io/images/6965281472087259884.png) EducationWith the ideal ITI determined, I can move on to the set of core experiments: testing to see how the DCMD neuron behaves when simulated black balls of different sizes and velocities approach the grasshopper’s exposed eye. So my little friends spend about 2 hours on top of the SpikerBox for these experiments. I continue […]
EducationWith the ideal ITI determined, I can move on to the set of core experiments: testing to see how the DCMD neuron behaves when simulated black balls of different sizes and velocities approach the grasshopper’s exposed eye. So my little friends spend about 2 hours on top of the SpikerBox for these experiments. I continue […] -
![[Summer’16 Internship] Neuroscience of Grasshopper Jumps: How does screen brightness affect DCMD response?](https://cdn.solveyourtech.com/wp-content/uploads/2012/06/change-ipad-2-screen-brightness-2.jpg) EducationNow that I’ve collected ample data for the “classic” experiment of testing the DCMD response to objects approaching at various sizes and velocities, I want to keep exploring grasshopper vision. So far, the iPad screen is kept at maximum brightness, so the contrast between the white background and the black ball is high and clear. […]
EducationNow that I’ve collected ample data for the “classic” experiment of testing the DCMD response to objects approaching at various sizes and velocities, I want to keep exploring grasshopper vision. So far, the iPad screen is kept at maximum brightness, so the contrast between the white background and the black ball is high and clear. […] -
![[Summer’16 Internship] Neuroscience of Grasshopper Jumps: New & improved ITI test](https://cdn.hackaday.io/images/1752921468206606500.png) EducationIn the ‘Preliminary data‘ log, I had begun my data collection and analysis journey. I first performed the intertrial interval, or ITI, test, to determine the ideal time between 2 stimuli so that the time is long enough to avoid the grasshoppers’ habituation to the simulated balls. The results figures I showed in that previous […]
EducationIn the ‘Preliminary data‘ log, I had begun my data collection and analysis journey. I first performed the intertrial interval, or ITI, test, to determine the ideal time between 2 stimuli so that the time is long enough to avoid the grasshoppers’ habituation to the simulated balls. The results figures I showed in that previous […] -
![[Summer’16 Internship] Neuroscience of Grasshopper Jumps: Recording live neurons: the SpikeRecorder app](https://backyardbrains.com/experiments/img/TheActionPotential_Web.jpg) EducationIn the project instructions, I’ve briefly talked about the BYB SpikeRecorder app that I’ve been using on an iPad to add to my grasshopper vision project the flavor of a low-cost-and-DIY-albeit-of-great-quality tool. Here, I’ll talk about it in a bit more details to give the spotlight to one of the main components of my project. […]
EducationIn the project instructions, I’ve briefly talked about the BYB SpikeRecorder app that I’ve been using on an iPad to add to my grasshopper vision project the flavor of a low-cost-and-DIY-albeit-of-great-quality tool. Here, I’ll talk about it in a bit more details to give the spotlight to one of the main components of my project. […] -
![[Summer’16 Internship] Neuroscience of Grasshopper Jumps: A new naming system for database!](https://cdn.hackaday.io/images/675821472080391922.png) EducationAs I experiment on more and more little grasshoppers, I realize the importance of organization skills. Specifically, I’m talking about how messy my housekeeping of the recordings and analyses have been. In an earlier post, I wrote that my naming system for each grasshopper is in the following format: [day][month][letter indicating order in the day]. […]
EducationAs I experiment on more and more little grasshoppers, I realize the importance of organization skills. Specifically, I’m talking about how messy my housekeeping of the recordings and analyses have been. In an earlier post, I wrote that my naming system for each grasshopper is in the following format: [day][month][letter indicating order in the day]. […] -
![[Summer’16 Internship] Arduino, EEG, and Free Will](https://blog.backyardbrains.com/wp-content/uploads/2016/10/freewill-600x450.jpg) EducationBy Patrick Glover DETAILS A longstanding debate in philosophy focuses on the existence of free will. Do humans have some inherent moral agency, or are our brains just biological machines, subject to the same physical determinism as any other animal? Modern neuroscience can provide some insight to these questions, such as Benjamin Libet’s famous 1986 […]
EducationBy Patrick Glover DETAILS A longstanding debate in philosophy focuses on the existence of free will. Do humans have some inherent moral agency, or are our brains just biological machines, subject to the same physical determinism as any other animal? Modern neuroscience can provide some insight to these questions, such as Benjamin Libet’s famous 1986 […] -
 EducationDESCRIPTION Do you consistently think “breathe in, breathe out” or “left, right, left, right” when you’re walking? Unless you’re London Tipton (http://dai.ly/x31iwo0?start=346 to 6:02), you probably don’t. How is this possible? All humans have neural networks called central pattern generators (CPGs) that control rhythmic movements like breathing and walking. Unfortunately, it is nearly impossible to […]
 -
![[Summer’16 Internship] The Dragonfly: Nature's Guided Missile](https://cdn.hackaday.io/images/5039591466595737682.jpg) EducationDESCRIPTION The dragonfly can capture its prey mid-air with a 95% accuracy rate. What biological equipment does the dragonfly have that allows it to do this amazing feat? To examine this very question, I will be replicating Paloma T. Gonzalez-Bellido’s 2012 PNAS paper using DIY open source tools. Gonzalez-Bellido found that there are neurons that […]
EducationDESCRIPTION The dragonfly can capture its prey mid-air with a 95% accuracy rate. What biological equipment does the dragonfly have that allows it to do this amazing feat? To examine this very question, I will be replicating Paloma T. Gonzalez-Bellido’s 2012 PNAS paper using DIY open source tools. Gonzalez-Bellido found that there are neurons that […] -
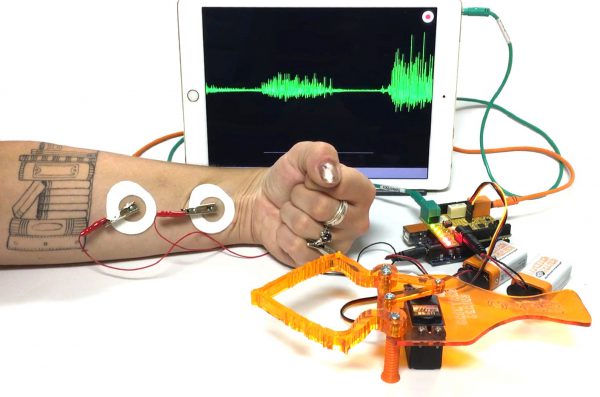 HardwareThe Backyard Brains Claw Bundle is the latest in our line of Muscle SpikerShield products! This kit comes with everything you need to begin experimenting with your first brain-machine interface. By using the electrical activity hidden within your muscles, you will learn how to control your first neuroprosthetic, the Claw! We’ve also provided a number […]
 -
![[Summer’16 Internship] Arduino, EEG, and Free Will: Measuring awareness times](https://cdn.hackaday.io/images/2015661470085560114.JPG) EducationLibet had the subjects view an oscilloscope with a dot rotating periodically in a circle, and subjects were asked to retroactively report where the dot was when they first became aware that they were about to perform the voluntary task. He could then calculate the average latency between when the subject reported awareness and when […]
EducationLibet had the subjects view an oscilloscope with a dot rotating periodically in a circle, and subjects were asked to retroactively report where the dot was when they first became aware that they were about to perform the voluntary task. He could then calculate the average latency between when the subject reported awareness and when […]